

How to get approved by Google Adsense within 2 hours?
Gone are those days when you apply for Adsense account and get approved without much stress but now, Google Adsense has grown a lot bigger over the years with millions of active publishers and because of this, their policies have become very strict giving a hard time to those who want to get their account approved. Also, it has become very common to see older accounts getting suspended due to flimsy excuses. To get an approved Adsense account, you might have many times, maybe you've never tried at all, maybe you’re worried if you’ll ever got approved… put all that negative brain waves aside, this post will get you an approved Adsense account within 2 hours if properly followed and implemented.
You might also like:-Google Adsense Best Alternatives 2013
I know you have been waiting for this, so I won’t waste any sec of your precious time trying to bore you with reasons why you need an Adsense account or why your request was not approved, just let get this started right away.
- Create a New Gmail account (tip: Choose United State as your location, some countries like Nigeria are not allowed to monetize Youtube videos).
- Login to youtube with your newly created Google account
- Click on youtube.com/account_monetization
- Enable your Youtube account for monetization
- You should receive a message in your inbox saying your youtube account is ready for monetization
- After the message upload a unique video to Youtube
- Be sure to add right descriptions and related tags to your video
- Wait for the upload to complete and hit publish
- Now that your video is monetized, what about Adsense Account?
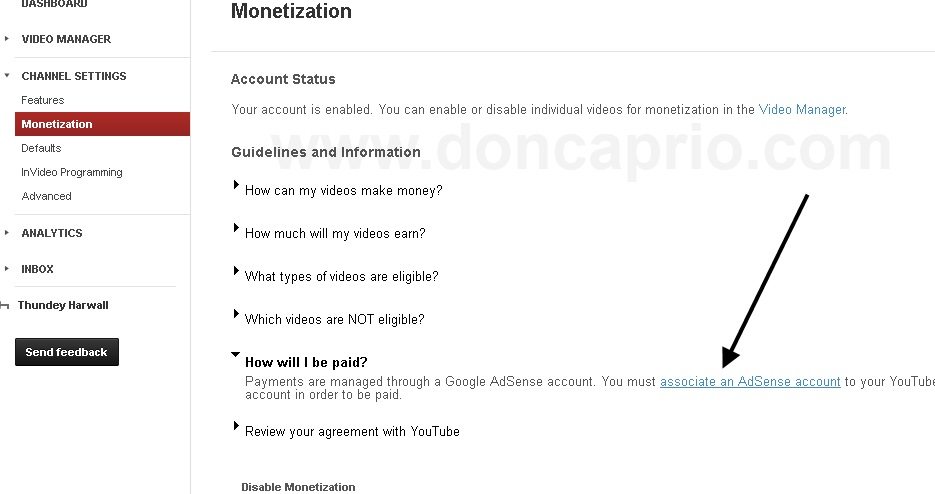
- Now go to Channel Settings>Monetization
- Now you should see your account status.
- Click on “How will I be paid”?
- Now click on “associate an Adsense account”
- Then you will be taking to where you will setup your Adsense account. The screenshot of the same is shown below:
- Make sure to fill the form accordingly, payee name and address is most important.
- Click submit and wait for your approval within 2 hours
- Okay, waiting……1hour…2hours….Now check your mail
- Wow! You’ve got an approved adsense account!
- Okay, the next step is to show ads on your blog/site
- If you’re using blogspot domain, (hosted account) this is very simple to do
- Login to your Adsense account and click on account settings
- Scroll down to the bottom to locate invite, enter the email of your blogger account and click on invite
- Now login to your Blogger account (where you want to show ads) click on earning tab
- Click on switch Adsense account
- Login to your Adsense account to associate your approved Adsense account with your blog
- Login in to your AdSense account.
- On the Home tab, click the Account settings page.
- In the “Access and authorization” section, next to “Only host sites are allowed to show ads for your account,” click edit.
- On the “Show ads on other websites” page that appears, enter the URL of the site where you plan to show ads.
- Click Submit.
- Finally you need to implement AdSense ad code on the URL that you provided above, on a page that receives traffic.



Check your inbox to verify the invitation, after successfully verification you can now login to your approved adsense with your blogspot email address and password
You should receive another congratulations message that Adsense gadget has been added to your blog. Click on Layout, you should be able to locate the Adsense gadget. If you don’t see it, do not panic, check your setting tab to make sure you’ve enabled ads to be showing on your sidebar or body content. After verification you should be able to see blank ads space on your blog, within 30 minutes real ads show be live on your blog.
If you’re using custom domain, I must tell you that Google has changed its policy for approving accounts via host partnered sites (custom domain), which require you to fill out a form and get approval from Adsense team before the ads begin to show on your non-hosted sites. Remember I said earlier that if you’re using hosted site (like .blogspot) you don’t need all this. To fill this form:
Once your request is approved, you can place your ad code on any website that you own without any further approvals. If your application is not approved, you should receive a message in your adsense account stating reason why your site is not approved, meanwhile you still got your approved adsense account and you can correct the errors and resubmit again.
You can see that blogspots domain (hosted account) got their ads up and running very easily and quickly; even with only a single post, Adsense will still be displaying on your blog, this is the reason I believe you see many blogspot domain running adsense with low quality content. That is it, guys.
I think I have mentioned all I think is necessary. In any case where you encounter any error or still need explanation please let me know in the comment box below.  Enjoy using your Adsense account and don’t forget to read and abide with Adsense policies to avoid getting banned. Also don’t forget to protect your Adsense account from getting click bombed.
Enjoy using your Adsense account and don’t forget to read and abide with Adsense policies to avoid getting banned. Also don’t forget to protect your Adsense account from getting click bombed. Read More
Add your Comment
0
comments
Read More
Add your Comment
0
comments
How to add stylish customised subheadings to blogger

Headings and subheadings are one of the most important parts in a post.Usually the readers don’t have the patience to read the complete post in one go.When the headings and subheadings of the post are attractive the readers may like to read it and the posts will be impressive.Also it gives a nice layout to the post,it will be very helpful to retain the visitors to the blog.
So for this,you should ensure that your headings and subheadings looks beautiful and stylish.For this I’ll show you how to make your headings,subheadings and minor headings stylish by CSS hover effect with colorful borders.
Please follow the below simple steps:
Customize your post title.
- Go to blogger dashboard>Design>Edit HTML
- Now press ctrl+f and find .post h3 and replace all of its contents with the code below.
/* The creator of this code is www.qrtricks.blogspot.com.com please don't change any thing without owner permisson */ .post h3 { text-align:left; font-size: 18px; font-family: Oswald; font-weight:normal; color:#000; padding: 3px 10px 3px 10px; text-shadow: 0 1px 0 #CCC; border: 3px solid #980303 ; -moz-border-radius: 90px; -webkit-border-radius: 90px; border-radius: 90px;-moz-box-shadow: 0 1px 2px #5bb5f0, 1px 1px 0 rgba(255, 255, 255, 0.4) inset; -webkit-box-shadow: 0 1px 2px #5bb5f0, 1px 1px 0 rgba(255, 255, 255, 0.4) inset; box-shadow: 0 1px 2px #5bb5f0, 1px 1px 0 rgba(255, 255, 255, 0.4) inset; margin: 15px 3px; text-transform: uppercase; line-height: 1.3; background:white; transition:background 2s; -moz-transition:background 2s; /* Firefox 4 */ -webkit-transition:background 2s; /* Safari and Chrome */ -o-transition:background 2s; /* Opera */ } .post h3 a, #content h1 a:visited { color: #000; font-size:17px; font-family: Georgia, Times New Roman; font-weight: normal; margin: 0 0 2px; padding: 4px 0 0; } .post h3:hover { color:#FFF; font-size:18px; text-decoration: none; background:red; border: 3px solid #000; }
Customize your subheadings
- Go to blogger dashboard>design>Edit HTML
- Press Ctrl +F.Find .post h2 and replace it with the following code below.
.post h2 { background: url("http://aux3.iconpedia.net/uploads/6930445441486693898.png") norepeat 2px center transparent; font-size: 20px; font-family: Oswald; font-weight:normal; padding: 3px 10px 3px 10px; color: #0274be; background:white; border: 3px solid #5bb5f0; text-shadow: 0 1px 0 #CCC; -moz-border-radius: 60px; -webkit-border-radius: 60px; border-radius: 60px; -moz-box-shadow: 0 1px 3px #5bb5f0, 1px 1px 0 rgba(255, 255, 255, 0.4) inset; -webkit-box-shadow: 0 1px 3px #5bb5f0, 1px 1px 0 rgba(255, 255, 255, 0.4) inset; box-shadow: 0 1px 3px #5bb5f0, 1px 1px 0 rgba(255, 255, 255, 0.4) inset; margin: 15px 3px; text-transform: uppercase; line-height: 1.3; transition:background 2s; -moz-transition:background 2s; /* Firefox 4 */-webkit-transition:background 2s; /* Safari and Chrome */ -o-transition:background 2s; /* Opera */ } .post h2:hover { background: url("http://aux3.iconpedia.net/uploads/6930445441486693898.png") norepeat 6px center transparent; background:#06F; color:#FFF; border-color:#FFF; }
Customise your minor headings
Minor headings in blogger use h4 tags.For its customization:
.post h4 { background-size:20px 20px; font-size: 12px; font-family: Oswald; font-weight:normal; padding: 3px 10px 3px 10px; color: #0274be; border: 2px solid #CCC; text-shadow: 0 1px 0 #CCC; -moz-border-radius: 30px; -webkit-border-radius: 30px; border-radius: 30px; -moz-box-shadow: 0 1px 3px #5bb5f0, 1px 1px 0 rgba(255, 255, 255, 0.4) inset; -webkit-box-shadow: 0 1px 3px #5bb5f0, 1px 1px 0 rgba(255, 255, 255, 0.4) inset; box-shadow: 0 1px 3px #5bb5f0, 1px 1px 0 rgba(255, 255, 255, 0.4) inset; margin: 15px 3px; text-transform: uppercase; line-height: 1.3; transition:border 2s; -moz-transition:border 2s; /* Firefox 4 */ -webkit-transition:border 2s; /* Safari and Chrome */ -o-transition:border 2s; /* Opera */ } .post h4:hover { border:#5bb5f0; }
- That’s all guys.Enjoy!!!!!!!!!!!!For further help just comment down below.We will be releasing more stylish headings
and more demanded tutorials and tricks soon.So stay updated and subscribe to our blog
I hope you liked this tutorial.For any related queries please comment below.
Read More
Add your Comment
0
comments
How to Add an Official Contact Form Widget to Blogger?
Blogger’s developer team is really working hard for the betterment of Blogger. Few months ago, They introduced Wikipedia Search Box widget. Now they have launched another widget i.e Contact Form Widget which allows you to add Official Contact Form widget to either sidebar or footer depending upon the location of widget box on your Template. It is a good news for blogger users because it will not disturb the page loading speed of Blog. This post contains the instruction for adding Official Contact Form widget to blogger.
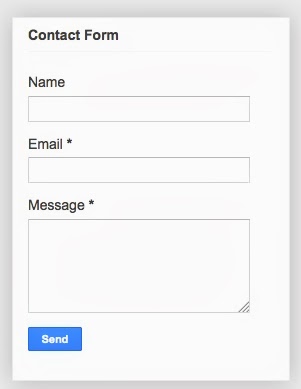
Official Contact Form by Blogger
Why You Should Use Official Contact Form Widget in Blogger?
I have found few reasons which are shown below:
- No Need of Using any Third Party Contact Form Any more.
- Doesn’t Show any impact on Page load Speed.
- You can customize it.
- Can be easily Added to either sidebar,Footer or any other places( Depending upon the template), where html/javascript codes can be added.
- Simple and Beautiful
How to Add an Official Contact Form Widget to Blogger?
Simply, Follow the below given steps and add the official Contact Form widget to blogger.
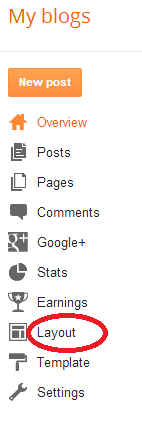
- In order to add it into your blogger blog,log into your account and click on Layout.The screenshot of the same is shown below:
- After that Click on “Add a Gadget“.The screenshot of the same is shown below.

- Now you will see a Pop up with many Gadgets.Click on “More Gadgets” option on the left hand side and choose the “Contact Form New!“.The screenshot of the same is shown below:

- After that, simply name your Contact Form. The screenshot for the same is shown below:

- Once done, Click on “Save” button and enjoy. The demo link for the same is shown below:
From the Editor’s Desk
It’s a nice widget for blogger users. Now they can use it in their blog. Officially, It doesn’t allow any facility to use in Pages. However you can use it in sidebar, Footer, Below Post or Above Post depending upon your Templates. I have tested it in both Default and customized blogger templates and is working fine everywhere.
What do you say about it?
Read More
Add your Comment
0
comments
5 Awesome Online Backlink Checker Tools for Your Website
Every website owner should understand and know how valuable it is to have the ability to create and monitor backlinks to their website. Having inbound links to your website is essential in order to help you obtain a higher webpage rank on Google. However, the backlinks you should have on your site should not be based on the quantity but more importantly on their quality.
Google has made quite a revamp on the matter by which they rank websites and backlinks are among the considerations or an important parameter used in page ranking by Google. Website owners should be concerned about getting quality backlinks on their site as part of their search engine optimization strategy. As a matter of fact, about 95% of the efforts of SEO is focused on building quality backlinks on their site and the focus is creating backlinks coming from high page ranking sites.

This process may involve quite a major undertaking among website owners but they can get some help using a backlink checker tool to make their task easier and more convenient when checking for quality backlinks on their site. Here are 5 of the best online backlink checker tools that you can use on your website with ease and without causing much of your time on running a backlink check on your website more thoroughly.
- BackLinkWatchThis is a highly popular backlink checker tool that you can use in finding the numbers of backlinks to your website or blog site. The backlink checker tool is free and it also suggests additional services for bloggers such as valuable information about the quality of backlinks and the visitor stats on your site.
- AhrefsThe site provides one of the largest index of live backlinks on websites. It runs an updated backlink checking every 15 minutes to find large index of links on websites. It is one of the website owner’s and SEO guru’s favorite backlink tool to use and it is also very convenient for the novice because it comes with a simple and user friendly interface to use as a backlink analysis tool. One can easily find the data of new and internal links, anchors, best pages and linking domains of a website. It is also capable of checking ranking and competition on keywords that you use on your site.
- Analyze BacklinksUsing the site’s backlink checker tools is very convenient and with easy to use interface. The process is simple and it provides an analysis on the backlinks for the website and it provides options such as not repeating backlinks coming from one and the same domain. You can also use other options such as filtering backlink search for anchor text, homepage links, outbound links and many others. The Analyze Backlink is highly intuitive to use as you can choose the kind of backlink check you want to run on your website.
- Majestic SEOMajestic SEO has about 10,000 users who rely on their backlink checker tool. It has a broad database of indexed backlinks and it provides the latest data while conducting many updates each day to give the web searchers quality and fresh backlink report on their website. Majestic SEO is a backlink checker tool that could provide valuable diagnostic report on your website’s backlink profile. The site is easy to use as well. Simply type your website on the search box to begin checking quality backlinks on your site. There are also tool kits available to help you do more from its backlink checker tool service.
- Open Site ExplorerThe Open Site Explorer is created by SEOMoz and considered to be one of the favorite backlink checker tools that is widely used by website owners and SEO strategists. It comes with a premium and free backlink checking service. The free version allows for a maximum of 3 searches for backlinks a day while the paid version allows the subscriber to perform an unlimited search on websites for quality backlinks. To get more value for your money, the premium version also provides additional features and diagnostic tools that will help you monitor your competitor’s website and other useful tools that you can use for your SEO strategy.
Read More
Add your Comment
0
comments
Google Adsense Best Alternative 2013

Have no text to check? Click "Select Samples".Search engines Adsense could be the word many of us hear by every blogger and it's also the great dream of every doodlekit to earn money online by way of Google Adsense. Coming over to Google Adsense network, It is definitely an Pay per click traffic advertising method with large paying network. Google Adsense enables its people to profit from their blog/website along with most desired ads.
But currently a day’s Google is just not allowing smaller publishers to use for fresh Adsense account a result of the increase in foibles. That is why it’s very difficult to acquire Approved Adsense consideration. If any the way we get authorized Adsense consideration we can’t claim and guarantee that our account will active.
Google may every time ban your current account with virtually no notice in addition to we feel be the end. Therefore it is better to stay clear of Adsense and soon you establish a massive blog or even website. You must not be disappointed as Adsense is just not the stop. There are a great deal of Google Adsense alternatives which you can try.
Here we now have Listed Top 6 Search engines Adsense Options:
But currently a day’s Google is just not allowing smaller publishers to use for fresh Adsense account a result of the increase in foibles. That is why it’s very difficult to acquire Approved Adsense consideration. If any the way we get authorized Adsense consideration we can’t claim and guarantee that our account will active.
Google may every time ban your current account with virtually no notice in addition to we feel be the end. Therefore it is better to stay clear of Adsense and soon you establish a massive blog or even website. You must not be disappointed as Adsense is just not the stop. There are a great deal of Google Adsense alternatives which you can try.
Here we now have Listed Top 6 Search engines Adsense Options:
1. Infolinks:
Infolinks is the greatest and the superior most In-Text Advertising Advertising method. It offers In-Text Advertisement for those text dependent blogs in addition to websites. The large advantage will be Infolinks approve just about every blog or a website. And it is also the 2nd best option of Search engines Adsense.
But here the leading drawback will be low simply click rate. You are able to withdraw your hard earned money from PayPal, Bank Insert Transfer and by utilizing Infolinks debit playing cards. Here the actual Minimum payment is 50$ intended for PayPal in addition to debit playing cards, 300$ intended for Bank Insert Transfer.
2.BuySellAds:
Here within the name themselves BuySellAds where one can buy advertisings (Publisher) in addition to sell advertisings (Advertiser). This is a Direct Advertising Ad Network. This website acts like a middle individual for equally Advertiser in addition to Publisher to fulfill together. Here the entire process is completed by BuySellAds and in addition they Keep the amount of money till the offer time will be completed. Many people charges twenty five percentage connected with transaction total for supplying the assistance.
We ca say it's also among the finest Google Adsense Options Advertising Network. Here acquiring approved BuySellAds account is just not so quick like some other ad cpa networks. We must have a quality website which has a neat layout with big traffic. You are able to withdraw your hard earned money from PayPal, Cheque, Bank Insert Transfer and the Minimum Agreed payment is 50$.
3. Chitika:
Chitika can be a Cost For every Click advertisement network which was founded inside 2003 and it's a search targeted advertising and marketing network. Chitika also approve most well founded blogs. Chitika sites the ads in line with the content in addition to pays a high click pace mostly for that US in addition to UK visitors. We may consider this as another best Search engines Adsense Options Advertising method.
We can certainly customize the actual ads, we. e. we could edit text message color, URL color and line color from the ad as outlined by our blog design. Below the advertisings are customized into 3 types. 1. Lookup Targeted advertisings 2. Mobile Ads in addition to 3. Nearby Ads. You may also earn some extra money from their referral method. You can certainly withdraw your hard earned money from PayPal, Cheque and the Minimum Agreed payment for PayPal will be 10$ in addition to 50$ is designed for Cheque.
some.
4. Adbrite:
Adbrite is very similar to BuySellAds. Here once you join this ad network you'll not get advertisings instantly unless and right up until someone buy ad put on your blog and you may also build your advertisement space value on every week basis, month to month basis and so on.
You possess a complete authority acknowledge or deny the advert. So that you can choose the actual ads associated with your blog or website. The key thing is that they can approve just about every blog or a website. You are able to withdraw your hard earned money from PayPal, Cheque and the Minimum Agreed payment is 100$.
5. Kontera:
Kontera is also an In-text Advertising network. It is related to Infolinks. They scan our websites in order to find the keywords which go with their keywords within the Database in addition to show Advertising Accordingly. To have approved inside Kontera the blog desires good in addition to huge web page impressions.
Kontera Payouts are really good along with high CTR. The primary drawback will be Kontera advertisings might slow loading time of the blog. Here you are able to withdraw your hard earned money from PayPal, Cheque, EFT and the Minimum Agreed payment is 50$.
6. Bidvertiser:
Bidvertiser is definitely an ad network that has the ability to the webmasters to advertise their advertisement space automatically on the highest putting in a bid advertiser. Here marketers are totally influenced by direct prices for bids from advertisers for many of their income. Bidvertiser currently pays added revenue intended for conversions.
We've got to provide some keywords and family of our website to get the ads shown, otherwise these people don’t are able to display ads associated with the context your webpage. In the some other advertising cpa networks like Search engines Adsense in addition to Chitika, they have the keywords of the website by themselves automatically. You are able to withdraw your hard earned money from PayPal, Cheque, Bank Insert Transfer and the Minimum Agreed payment is 10$.
Please don't keep yourself yourself quiet. Leave your positive feedbacks for the improvement of this site.
Read More
Add your Comment
0
comments


